FTP stands for File Transfer Protocol
FTP stands for File Transfer Protocol and is a method of sending files securely from one computer to another. Knowing how to transfer files back and forth between computers is essential for webmasters who need to make changes and upload new files regularly.
Most of us use FTP all the time whether we realize it or not when we download files to our computer. When downloading a file from the Internet we are remotely transferring the file from the computer hosting it to our own using our Internet connection.
What is an FTP Site?
The best analogy for an FTP site is to think of it as a filing cabinet.
The best analogy for an FTP site is to think of it as a filing cabinet. Files are labeled in a meaningful and organized way by the person in charge. Some files are locked away and kept private while some are freely accessible to the public. An FTP site works in a similar way.
The creator or owner of an FTP site may be willing to given open access to files. If this is the case, to get into an FTP site all the public user needs is a User ID, which is usually 'anonymous' and a password, which is usually the users email address. If the FTP site is not public, the owner will issue a unique User ID and password for every person who is allowed access to the files.
FTP sites that allow anonymous logins will most likely not prompt you for a name and password. When you are downloading files from the Internet, you most likely are using an anonymous FTP login without being aware of it.
Most hosting accounts allow account holders to set up ftp accounts. Using this feature webmasters can allow individuals or groups access to certain certain files and the freedom to upload or download files from their server.
There are two ways to make an FTP connection, via your standard Web browser such Internet Explorer or Firefox or by using dedicated FTP software program, also called an FTP Client.
The first option is not recommended. Uploads are difficult and slow when using a Web Browser as an FTP connection. Also, the option isn't very secure. Your downloads are not protected and there can be problems when uploading or downloading large files.
Using an FTP Client makes the process a whole lot easier and gives you the benefits of added security and efficiency because of the additional features that these software program have built in. Files can be queued, ftp uploads can be resumed after disconnection or if files didn't download completely.
FTP Software
An FTP Client is a piece of software that is designed to simplify the transfer files
Most of us use an FTP Client or piece of software that is designed to simplify the transfer of our files back and forward between computers. An FTP client needs to be downloaded and installed on your computer and needs a live Internet connection to work. There are many free FTP clients to choose from. Each will have advantages and disadvantage depending on what you are planning to use the software for. During this tutorial, we will be working with Filezilla, a freely available open source ftp client.
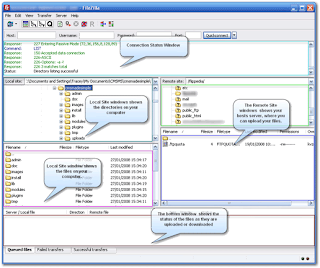
Most ftp clients will look very similar, usually with two main panels that will show the files on your computer in one panel [usually the left] and the files on the remote computer you are connecting to in another panel, typically on the right. Transferring the files is as easy as dragging and dropping from one panel to another or by selecting a file and choosing the upload/download option.
Most FTP Client include advanced features, such as a scheduling feature, multiple file transfer, a resuming feature; a queuing utility, an FTP find utility and a scripting utility for advanced users.
How to download, install and run Filezilla
Windows

FileZilla_3.3.2_win32-setup.exe (recommended) Size: 4160064 bytes
FileZilla_3.3.2_win32.zip Size: 6181549 bytes
Windows XP, Vista and Windows 7 are supported
Linux Operating system

FileZilla_3.3.2_i586-linux-gnu.tar.bz2 Size: 4675016 bytes
FileZilla_3.3.2_x86_64-linux-gnu.tar.bz2 Size: 5072590 bytes
Built for Debian 5.0 (Lenny). It is highly recommended to use the package management system of your distribution or to manually compile FileZilla if you are running a different flavour of Linux.
Mac OS X Operating system

FileZilla_3.3.2_i686-apple-darwin9.app.tar.bz2 (Intel) Size: 4917474 bytes
FileZilla_3.3.2_powerpc-apple-darwin9.app.tar.bz2 (PowerPC G4) Size: 4744979 bytes
Requires OS X 10.5 or newer
Source Code
FileZilla_3.3.2_src.tar.bz2 Size: 3186595 bytes
Checksums
FileZilla_3.3.2.sha512
- Download the latest support version of the Filezilla. Download this file to your hard drive where you can easily find it, most likely your desktop.
- Double click on the Filezilla installer that you downloaded in step 1. This will start the Filezilla installation. Select your language and click 'OK'.
- Read the License Agreement and click on the "I Agree" box.
- On "Choose Components", leave it unchanged ("Standard" setting) and click "Next"
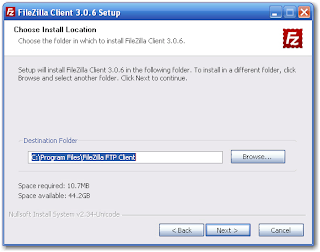
- You now need to select where you would like to install Filezilla. It is best to use the default location that Filezilla recommends during the setup
Choose a Start Menu Folder. Again, the default location is sufficient. Click Install and the setup is complete.
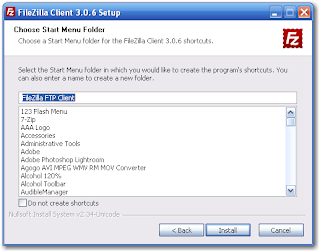
Once install has completed, click the close button.
Did the installation work?
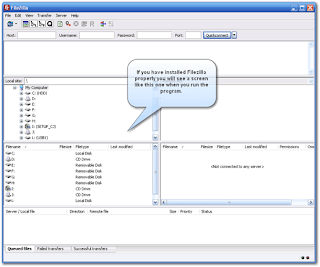
To check, find the new shortcut to Filezilla on your desktop and double click it.
If the install was successful you should now have a window that looks like the image below.
Once you've downloaded and installed FileZilla you need to configure the program to connect to your web host.
We do this using the Site Manager, where you need to enter all the information for the connection you want to set up. You only need to enter this information once.
The site manager lets you add as many sites to Filezilla as you like . We're going to focus on adding a domain and connecting to our hosting account.
You will have received all of the details you need to set up a site in Filezilla from your host, most likely in the email you were sent after you account was set up. To set up your site in Filezilla you will need an ftp address, username and password.
Let's begin to set up our first site in Filezilla
To do this we will need to use the Site Manager found at File » Site Manager
You should now see a window appear like the one in the image below.
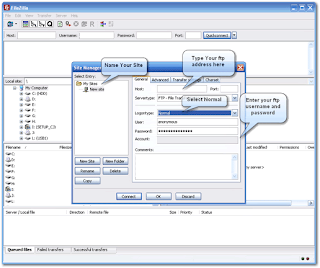
1.First you click on New Site. You can type in whatever name you want here, but it's probably best to keep it to the name of your new site. You may want to add more sites at a later date and keeping things organized from the beginning will help.
2.The Host is where you write your ftp URL . This is usually something like ftp.mysite.com or it can be your website address.
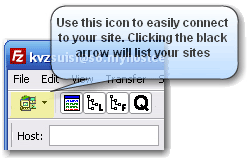 3.Enter your username and password. You will only be able to access the Username and Password areas when you check the Logon Type as Normal. Your username and password will have been emailed to you after yourhosting account was set up.
 4.Click Connect! You are now connected to you host and ready to upload and manage your files.
An explanation of the Filezilla Windows
Tranferring Files
Uploading Files
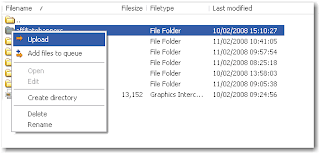
Now you know how to set up an FTP connection, lets move on to transferring files. To browse through your folders on your computer, simply double click on directories in the Local Site window. To transfer your files, highlight the files or folder you want to transfer and then right click to bring up the options menu. Click on the 'Upload' option to the transfer files.
Make sure that you have selected the correct location for your files to be transferred to on your server. Navigate through the directories and files on your server in the same way, by double clicking on folders in the Remote Site window.
File Locations and Urls - the directory you upload you send your files to will become the url for that file. If you upload a file called wibol.zip to the public_html/downloads/ directory, the url for that file will be www.examplesite.com/downloads/wibol.zip
To select more than one file or directory at a time, click on each file or dirctory you'd like to transfer while holding down the Ctrl key on your keyboard.
If all of the files you'd like to upload are all together, you can click on the first file while holding down your Shift key and use the down arrow on your keyboard to highlight all of your files.
ASCII and Binary Mode
There are two options for transferring files using an FTP client, ACSII and Binary. By default, Filezilla is set to 'auto' which is generally sufficient. However, you may at times need to change the file transfer mode. For example, when uploading files such as text, HTML, and most scripts you should should set the transfer mode to ASCII. Any file that is not ASCII text, such as .exe or zip files, graphics, ebooks, or sounds such as wavs and mpegs should be uploaded to your server in Binary mode.
To change the transfer mode, select Transfer >> Transfer Type and choose your option from the list.

Keep in mind, all of the files you select must be uploaded in the same mode. In other words, you could upload all of your HTML files at the same time, or all of your images.
Downloading Files
One good reason to use FTP is to download files. FTP is much faster than standard HTTP downloads (through your browser). The two ways to download via FTP are quite easy. One is to find the file you want on the Internet and then copy the shortcut to the file. After doing this open your FTP program and paste it into the Quick Connect dialog box. Click OK and the program will connect to the file and begin to download it.
The second way to download a file via FTP is to connect to a download site through the software and then navigate through it to find the files you want. Usually these sites allow you to log in using anonymous FTP. This means that you either do not enter a user name and password or use anonymous as your user name and your e- mail address as your password.
USEFUL SHORTCUT KEYS
F5 » Refreshes local and remote file and folder views
Tab » Switches to the next view
Ctrl+C » Stops the current operation
Ctrl+D » Disconnects from server
Ctrl+Q » Connects to the server entered in the Quickconnect bar
Ctrl+R » Reconnects to server
Ctrl+S » Opens the Site Manager
Ctrl+T » Shows or hides the treeview
Changing File and Directory Permissions Using Filezilla
All files on your server have permissions or access rights associated with them. These are usually set to protect files from being abused by unauthorized parties. In order to allow interactions with certain parts of your websites, for example, add photos to an images gallery, you may need to change the mode of the certain file [CHMOD] to be less restrictive.
CHMOD: changes the permissions for a file; permissions should include a letter designating who gets permissions [u for the user, g for the group, o for others, or a for all] followed by a + or - to give or take away the permission - followed by the kind of permission - r for read access, w for write access, x for execute if the file is a program or script
To do this right click over the directory or file you want to change access rights for. Select File Attributes from the drop down menu.
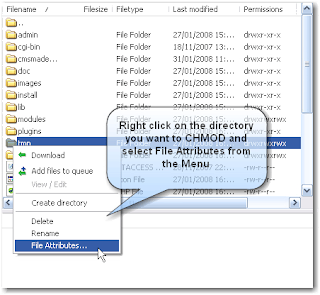
This will bring up the Change File Attributes dialog box. Simply enter 777 into the Numeric Value Field to change the permissions and click OK.
Understanding Directory Permissions
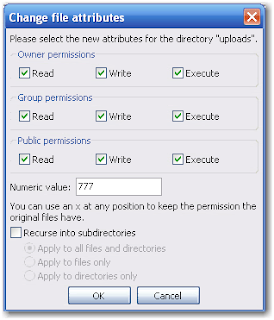
- Read permissions are enabled with the number 4 or the letter r.
- Write permissions are enabled with the number 2 or the letter w.
- Execute permissions are enabled with the number 1 or the letter x.
- No permissions are enabled with the number 0 or a dash.
Each of these permissions will be set for each of the following:
1. Owner
2. Group
3. Other
To give you a better idea of how permissions are set, below is an example of a script that requires the permissions to be set to 755 -- it breaks down like this:
7 - Represents the permissions for the Owner (you). The owner has been given Read, Write and Execute permissions. 4+2+1=7. This can also be written like this: rwx
5 - Represents the permissions for the Group (individuals with access to your server). The Group has been given Read and Execute permissions. 4+1=5. This can also be written like this: rx
5 - Represents the permissions for the Others (website visitors). The Others have been given Read and Execute permissions. 4+1=5. This can also be written like this: rx 755 is equal to rwxrxrx
Tidak ada komentar:
Posting Komentar